

Publishing C/S Applications refers to a variety of application installed on the GWT server architecture and released. Its purpose is to change
the deployment C/S program, and allow the operator using any network to access GWT server and operate it.
Step one: Start the application publishing wizard, as shown below:
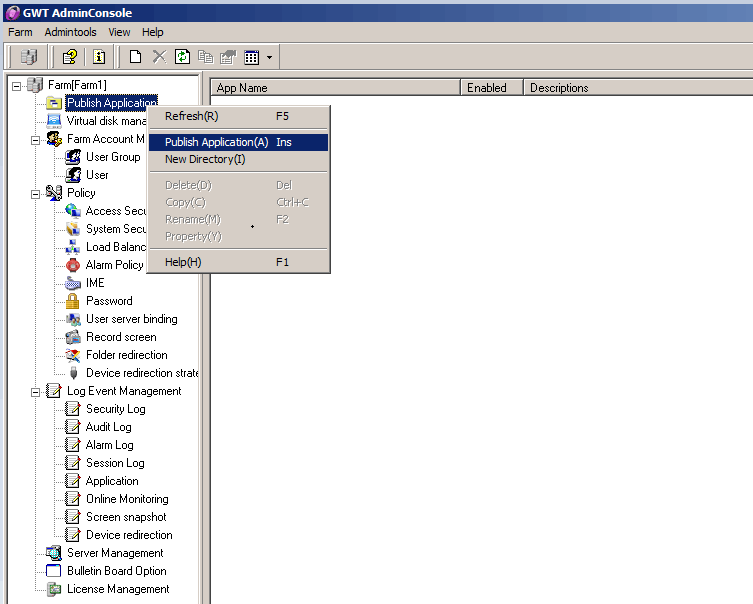
Interface Configuration and Item Description:
♦ In the main interface GWT System Management Console, right-click【Publish Application】and select【Publish Application】. You can pop
up Publish Application Wizard.
Step two: Set the Display name and description, as shown below:
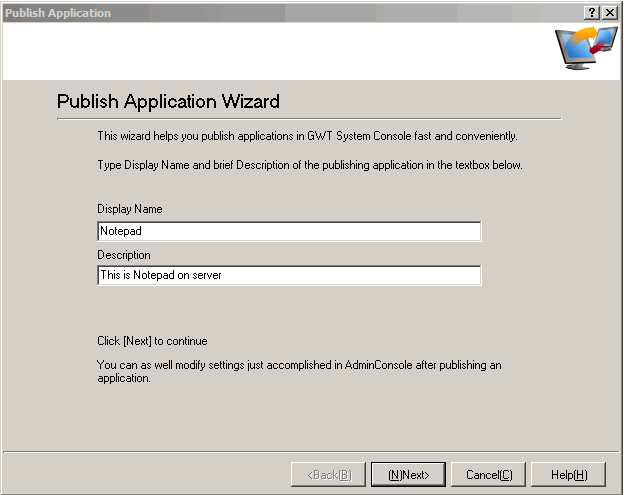
Interface Configuration and Item Description:
♦【Display Name】need to fill in the name of being a published application can not be empty;
♦【Description】is published application instructions, according to the actual situation described may be empty;
Step three: Set the application type and the path address, as shown below:
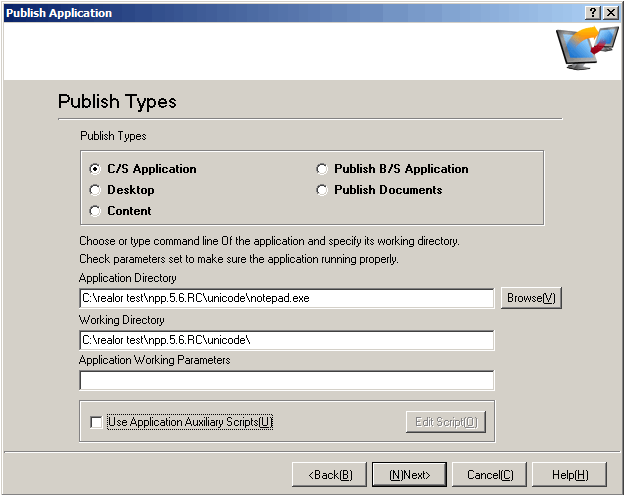
Interface Configuration and Item Description:
♦ In【Publish Types】, select【C/S Application】 (This Section to publish the C/S Mode Program as an Example);
♦【Application Directory】in the program need to fill in the correct path of the current release, or click 【Browse】to browse to the path where
the application is installed to prevent the release shortcuts lead to "access your application does not exist" and so on.
♦【Working Directory】is the current application installed storage directory location.
♦ Use the application helper scripts: set to perform other tasks while the application is running, select and click【Edit Script】, (the default is
not selected) as shown below:
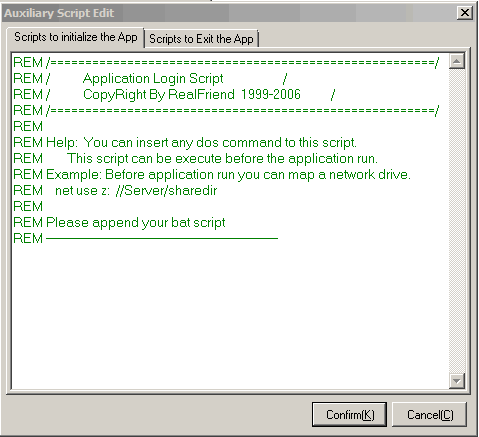
Interface Configuration and Item Description:
Before the application starts, you can set up some scripts, mainly for the operating environment to configure the application.
Step four: Application Appearance Configuration, as shown below:
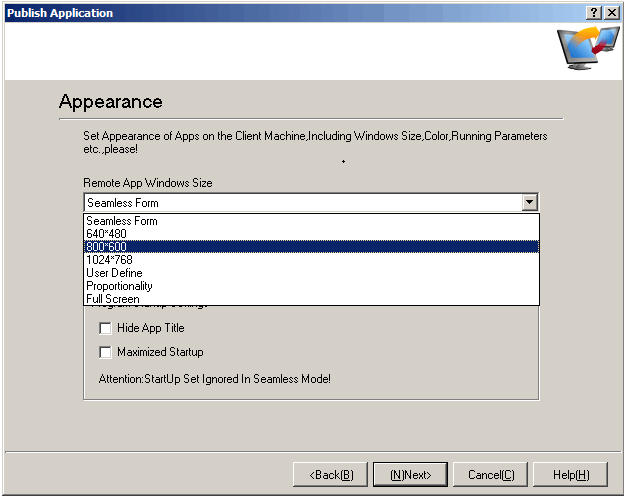
Interface Configuration and Item Description:
♦ Seamless form: It refers to the client to use GWT server program that can switch seamlessly with the native screen, set the published
application is "seamless form" appearance. The visit is to run this application as customers local to the application. The program will run
minimized. You can see the local desktop. Interactive experience is good (default is seamless).
♦ Full screen: Refers to when surfing on the client access server publishing applications, this application will run full-screen. After the program
is minimized, the background is a blue screen.
♦ Other appearance ways, such as 640x480,800x600,1024x768, User Define, proportionality and other appearance settings. You can choose
to set according to the operating environment that published application needs or user experience.
♦ Remote client program window color is the color of the GWT published applications from the client is displayed. The GWT system provides
256 colors and 15-bit color, 16-bit color, 24-bit color, can be selected based on network communication speed. The bigger color requires
more traffic speed.
♦【Hide Application Title】Refers to the remote client to open a published application system, whether to display the title bar of the application;
♦【Maximized Startup】Refers to the remote client to open a published application system, maximize application program interface.
Note:
♦ Some applications under the provisions of the window size and color work, need to be set according to the appearance of different
applications.
♦ In seamless window, there is no need to set the application title, when the program starts as maximized size.
Suggestion: Try to form a seamless mode is set to meet most applications supported resolution.
Step five: Set Icons, as shown below:
![]()
Interface Configuration and Item Description:
♦ Icon which is user to see, the role of the shortcut icon is commonly used system default, you can also set up personalized icons for your
application.
Step six: Remote Clients Settings, as shown below:
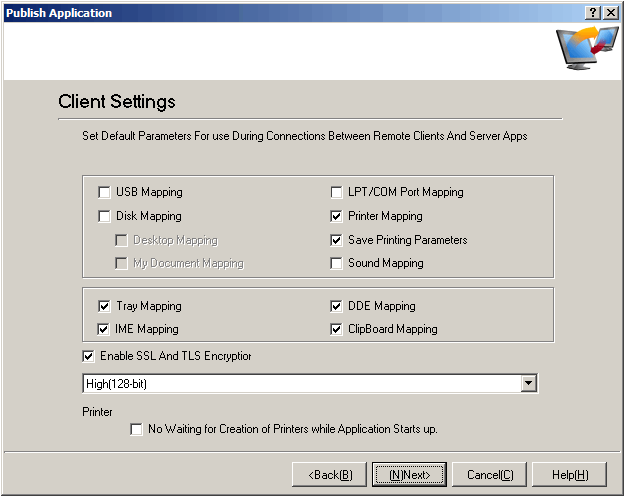
Interface Configuration and Item Description:
♦【USB Mapping】: The client USB related device map to the server you need to select this (the default is not selected).
♦【Disk Mapping】: Refers to whether the client's disk is mapped to the server, data on the server can be saved to a local disk. (Default is not
selected, the data is only stored on the server).
♦ 【Sound Mapping】: Refers to whether the client's audio device mapped to the server, implement the audio from the client-side play at
service. (The default is not selected).
♦【LTP/COM Port Mapping】: Refers to whether the client's LTP/COM port device mappings to the server. (Default is not selected)
♦【Printer Mapping】: Refers to whether the client printer device connected to the server via the mapping mode.
♦【Save Print Parameters】: Refers to the use of mapping print mode, whether the print parameters are saved to the server. (The default is
selected).
♦【IME Mapping】: Refers to whether the client to use the server input method; (selected by default)
Note:
♦ GWT system with local input and local printing technology, although selected by default print server and server input mapping, but doesn’t
affect the use of local input and local print function. Because the key is input by the client and print setup switch determines which input method
and printing method used.
♦ If you want to use an input method and mapping print ,【Input Method Mapping】and 【Printer Mapping】must be selected. And make the
appropriate settings on GWT client, setup method: Right-click GWT client (the lower right corner of the computer, small pink icon) - select
System Settings-local property, select【Use Server Input Method】 and 【Printer Mapping】. If you need to use the local input and local
printing, select【Use Local Input Method】, as shown below:
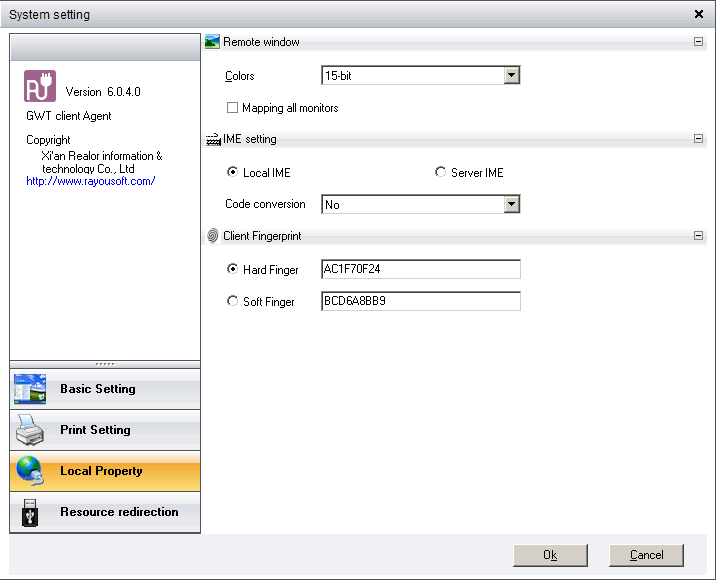
Client configuration recommendations:
Clients don’t need to modify the default parameter settings. The default option is to use the local input and local printing mode, but if a client has a
special printer or the effect of the user's input method for a client's experience is not good, just in the client option to adjust the parameters,
change
to use the server input method or servers mapping print mode.
Step seven: Set Application Specialty, as shown below:
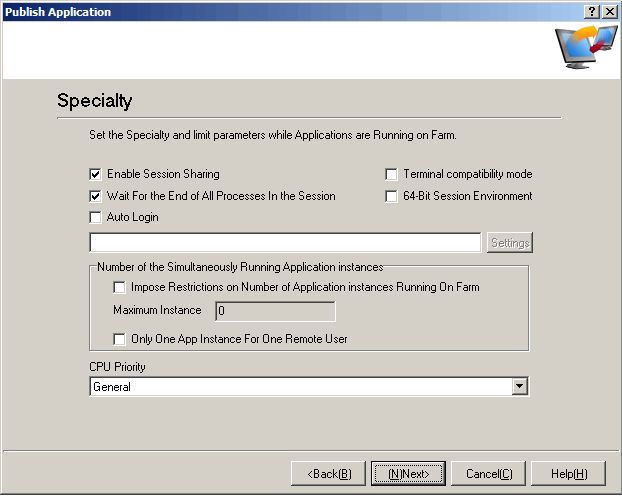
Interface Configuration and Item Description:
♦【Enable Session Sharing】 is GWT system highlights functions. The main effect is when a client user to open multiple applications on GWT
servers, systems and servers only need to establish a session connection, which can effectively reduce GWT server resource consumption,
bandwidth consumption, connection consumption, in the GWT Virtual Application System published applications more long time. The
effect is more obvious.
♦【Terminal Compatibility Mode】 also highlights GWT product feature that resolves the conflict between the applications and terminal
environment, but also allows some of the applications can run up which can’t run in a terminal environment, according to your actual setting.
♦【Wait For the End of All Processes In the Session】: When a client use an application on a server, you may open the program associated
with the program or the associated process. If selected【Wait For the End of All Processes In the Session】, then the current session is
waiting for ending after all processes (primary process and the associated process) end. If not selected【Wait For the End of All Processes
In the Session】, the associated process will end while end the main application main process, then end the session ( The system default is
not selected).
♦【Auto Login】Refers to the application whether to use automatic login mode, see "Single Sign On" section of the settings.
♦【Number of Application Instances Running Simultaneously】Refers to a client can simultaneously open applications instances. This can be
set to allow an account only open one instance of the application or a few instances. The default is not selected, allowing client open multiple
applications simultaneously, such as select 【Limited Maximum Number of Instances the Applications Running In the Farm 】. You need to
open the application settings to allow the number of instances, the default number is "0" means unlimited. If select【Only Allows Each User
To Use an Instance of an Application】, each user can open only one instance of the application. System administrator can be set according
to the number of licenses purchased application and server performance.
♦【CPU Priority】: CPU priority is the CPU on the server to run this application priority response settings, there is generally, high, free, real-time four selection to choose from.
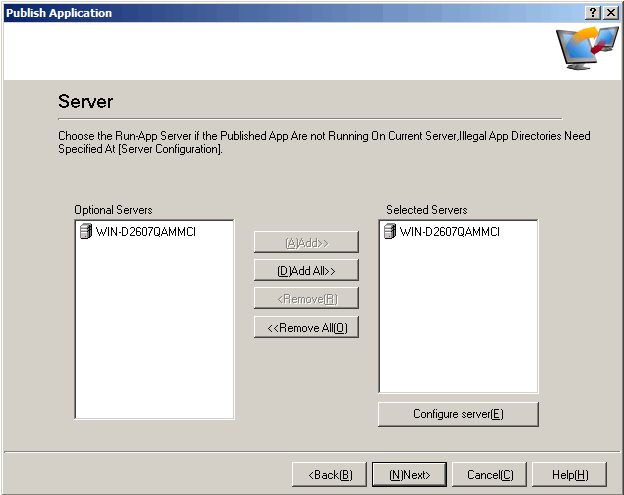
Step eight: Specify a server, as shown below:
Interface Configuration and Item Description:
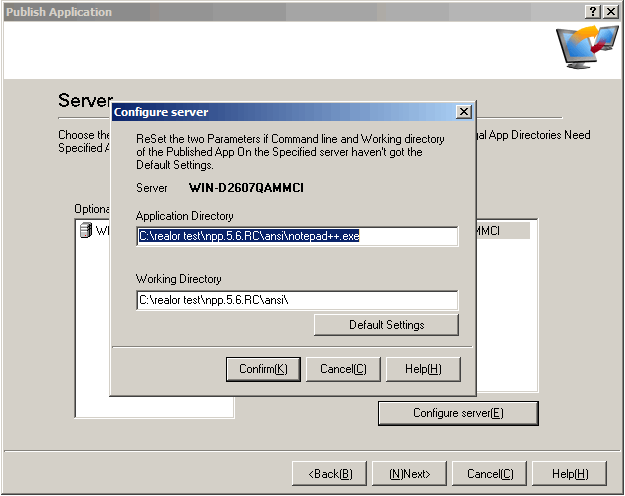
♦ Select the server where the application is, if it is a server you can add directly. If it is more than one server, the server will have the
appropriate configuration. The configure methods similar to step two that configure the path where you can fill out an application, as shown
above.
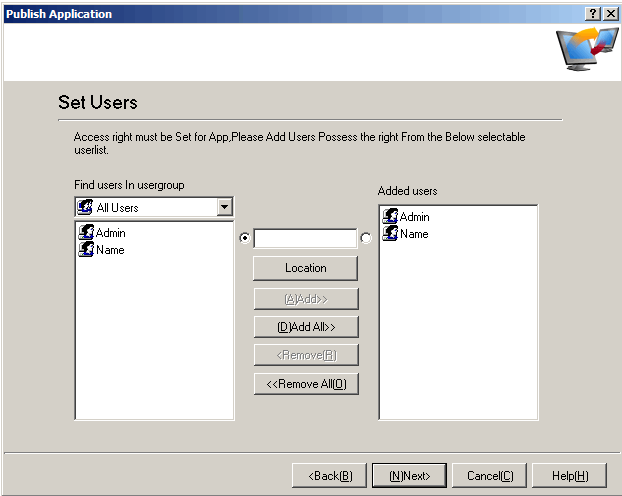
Step nine: Set Users, to add account that the current publishing applications can access, as shown below:
Interface Configuration and Item Description:
♦ Select the account on the left list box, and click【Add】, to allow access to the account of the application can be added to the list box on the
right, or click【Add All】will join in all on the left to the right account. If you want to change the operation, select the account has been added to
the right click【Delete】or click【Delete All】.
Interface Configuration and Item Description:
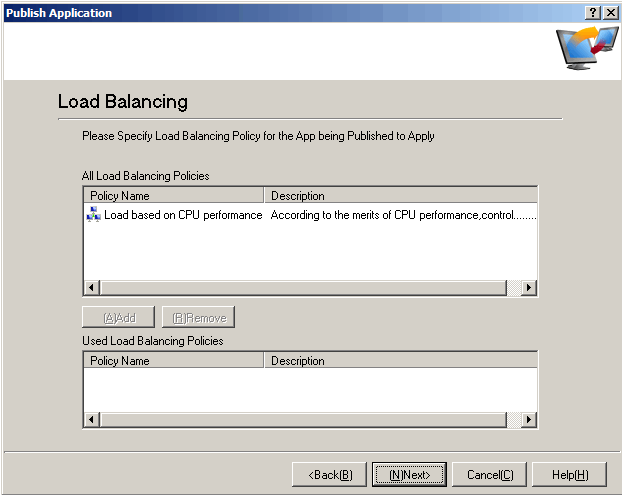
♦ Select a Load Balancing Policy, click【Add】,the setting of these load balancing strategy detailed in the length of follow-up (There is no need
to set a single server load balancing strategy), then directly click【Next】.
Step ten: Configure Alarm Policy, as shown below:
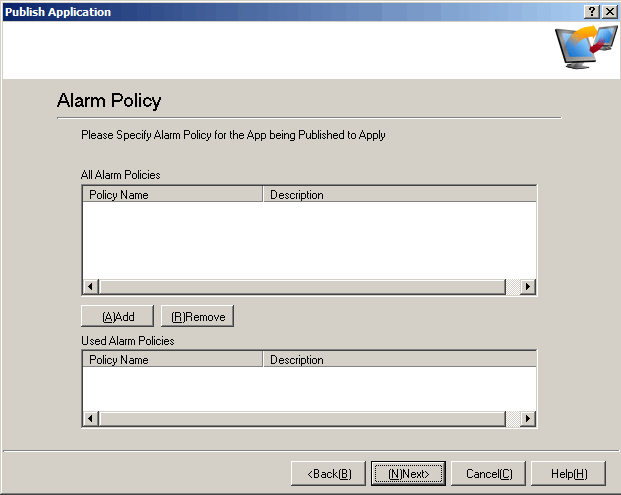
Interface Configuration and Item Description:
♦ Add alarm policy (in order to maintain the integrity of chapters the policy settings section see the subsequent chapters) and click【Next】.
Here you can also directly click【Next】, and then set the alarm when the policy is applied to the appropriate server.
Step eleven: Application Associated File Types Settings, as shown below:
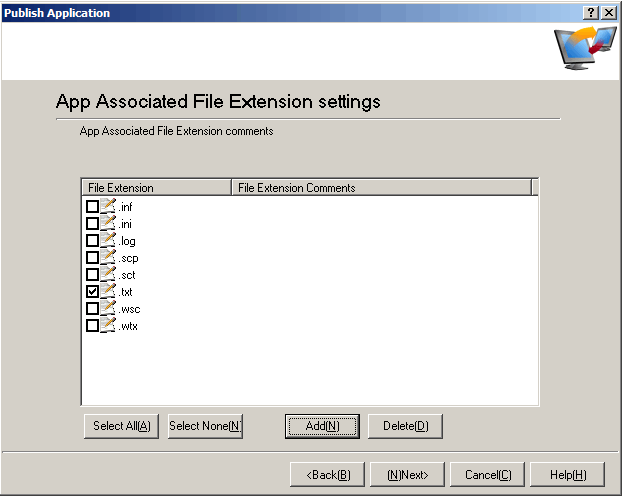
Interface Configuration and Item Description:
♦【Set the Application To Open the File Extension】is GWT product highlights property. It is for client computers without installing this type
of application to open the document, published by GWT server application to open, for example, GWT server published word application opens
the document of ".doc" on the client computer;
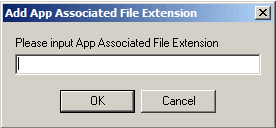
♦ Can add new opening application extension, click【Add】to make the appropriate settings, extension name can be ". xxx" (with dot), you can
also define a "xxx" (without dot) as shown by shows:
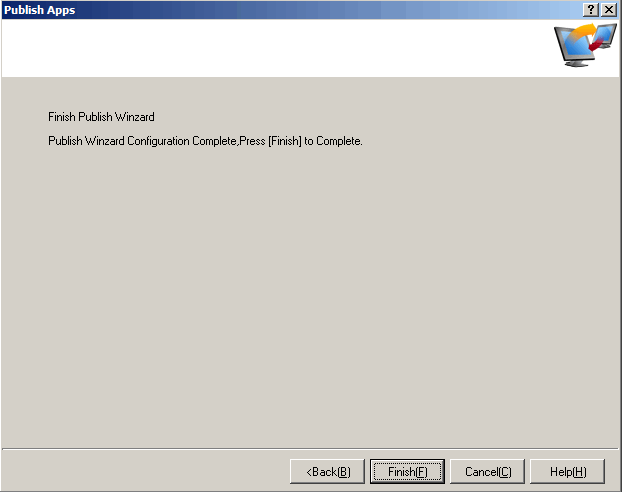
Step twelve: Application to finish, as shown below:
B/S program refers to Browser/Server architecture application, via GWT system can be converted it into A/S application mode to help users
solve the B/S to access slower, access encryption and authentication process safety management and so on.
B/S program released is nearly the same as C/S operations, in which we have omitted the same procedure described due to space limitations,
only partially explain the difference, so that administrators can find differences, quickly grasp to publish B/S program mainly to solve the access
speed slowly and security issues of B/S program. Publishing methods are arranged in the LAN, and similar to Realor has published the LAN B/S
IP or domain name.
Step one: Start the application publishing wizard. <Same with Publish C/S program>
Step two: Set the application name and description. < Same with Publish with C/S program>
Step three: Set the application type and the path address, as shown below:
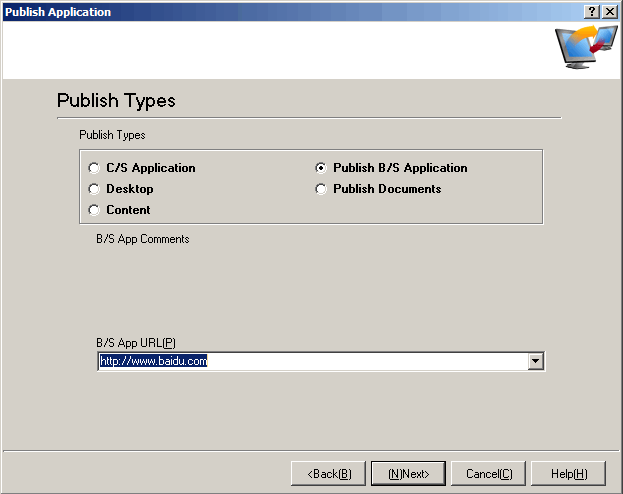
Interface Configuration and Item Description:
♦ Publication Type Select 【Publish B/S Application】. B/S application URL fills in the B/S program address.
Step four: Set Application appearance < Same with publish C/S Application >
Step five: Set the application icon < Same with publish C/S Application >
Step six: Remote client settings < Same with publish C/S Application >
Step seven: Setting application Specialty < Same with publish C/S Application >
Step eight: Specify a server < Same with publish C/S Application >
Step nine: Set Users < Same with publish C/S Application >
Step ten: Add load balancing strategy < Same with publish C/S Application >
Step eleven: Add alarm strategy < Same with publish C/S Application >
Step twelve: Completed application publishing < Same with publish C/S Application >
Desktop publishing refers to the publishing server's desktop, enabling system administrators to regularly maintain server functionality, provides
system administrators with a convenient to remote maintenance server, while eliminating the maintenance of the server via Remote Desktop
potential security.
Step one: Start the application publishing wizard. < Same with Publish C/S Application >
Step two: Set the application name and description. < Same with Publish C/S Application >
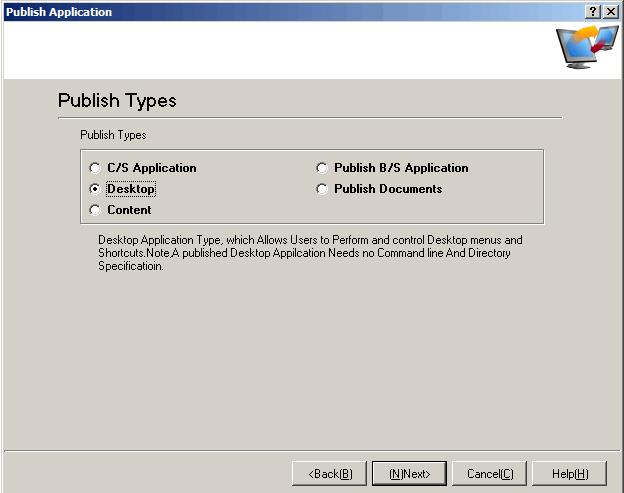
Step three: Set the type of application as shown below, select【Desktop】.
Step four: Set Application appearance < Same with Publish C/S Application >
Step five: Set the application icon < Same with publish C/S Application >
Step six: Remote client settings < Same with publish C/S Application >
Step seven: Setting application Specialty < Same with publish C/S Application >
Step eight: Specify a server < Same with publish C/S Application >
Step nine: Set Users < Same with publish C/S Application >
Step ten: Add the load balancing strategy < Same with publish C/S Application >
Step eleven: Add alarm strategy < Same with publish C/S Application >
Step twelve: Completed application publishing < Same with publish C/S Application >
Publish content refers to some special pages, documents, videos published out for the client to use, commonly as companies publish news or
notification.
Step one: Start the application publishing wizard. <Same with Publish C/S Application >
Step two: Set the application name and description. <Same with Publish C/S Application >
Step three: Set the application type and the path address, as shown below:
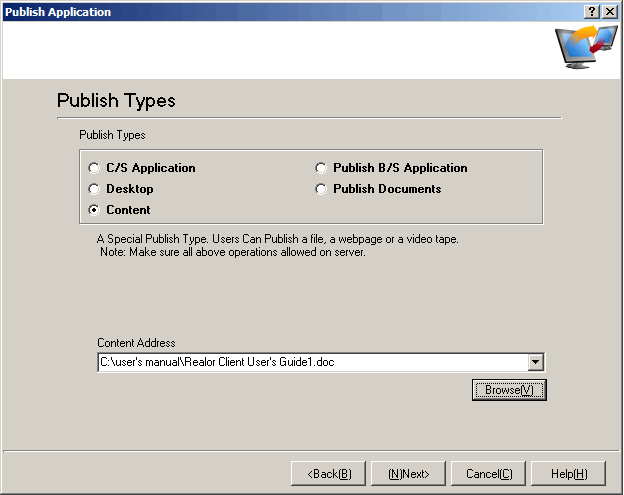
Interface Configuration and Item Description:
♦ Select【Content】. The content address need to fill in the path address of the publishing content or URL, or click【Browse】to get the current path of the content located in.
Step four: Set the application icon <Same with Publish C/S Application >
Step five: Set Users <Same with Publish C/S Application >
Step six: Application Publishing completed <Same with Publish with C/S Application >
Publish document refers to various documents used by the client will need to secure to publish out, for the client to look up.
Step one: Start the application publishing wizard. < Same with Publish C/S Application >
Step two: Set the application name and description. < Same with Publish C/S Application >
Step three: Set the application type and the path address, as shown below:
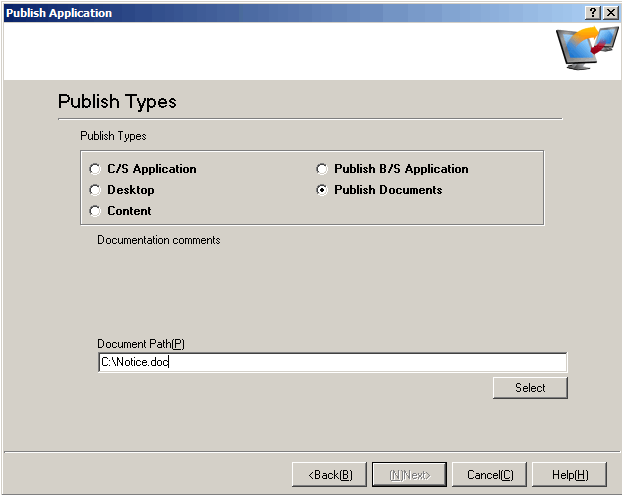
Interface Configuration and Item Description:
♦ Select【Publish Documents】, fill in the path of the current document or Web site address, or click【Select】to get the current document
located in.
Step four: Set Application appearance < Same with publish C/S Application >
Step five: Set application icon < Same with publish C/S Application >
Step six: Remote client settings < Same with publish C/S Application >
Step seven: Setting application Specialty < Same with publish C/S Application >
Step eight: Specify a server < Same with publish C/S Application >
Step nine: Set Users < Same with publish C/S Application >
Step ten: Add load balancing strategy < Same with publish C/S Application >
Step eleven: Add alarm strategy < Same with publish C/S Application >
Step twelve: Completed application publishing < Same with publish C/S Application >